
Modern lighting has evolved far beyond the simple bulb and socket. The latest generation of fixtures merges the light source directly into the unit itself, creating a seamless, efficient, and remarkably sleek solution. This is the world of integrated LED technology, and when paired with a press-fit installation method, it represents one of the most user-friendly advancements for both new builds and renovations.
These systems, often called canless recessed lighting or led wafer lights, eliminate the bulky metal cans of old. Instead, a thin, self-contained unit houses the LEDs, driver, and connection points. The installation? Often as simple as making a junction box connection and pressing the fixture into a cut drywall hole. Its a clean, modern look achieved with minimal fuss.
What Are Integrated LED Press-Fit Lights?
At their core, these are all-in-one lighting modules. Unlike traditional recessed lights where you install a housing (“can”), then a separate trim, and finally a bulb, an integrated LED fixture combines everything. The LEDs are permanently attached to a board, paired with a driver (the power supply), and finished with a built-in trim ring. The “press-fit” refers to the installation mechanism: spring-loaded clips or tension arms that snap securely against the back of the drywall when the thin assembly is pushed into place.
This design is a game-changer for shallow ceiling cavities or concrete slabs where traditional cans won’t fit. They’re the go-to choice for a fast, clean remodel led housing solution. Honestly speaking, the shift towards these ultra-thin profiles is one of the most significant trends in residential and commercial lighting right now.
Key Components and Terminology
- LED Driver: The essential power converter. It transforms your home’s AC voltage to the low-voltage DC power the LEDs need. Its quality directly impacts the light’s lifespan and performance.
- Trim Ring: The visible bezel or flange that sits flush against the ceiling. On press-fit models, this is part of the monolithic unit.
- Mounting Clips: The spring-steel arms that deploy when the fixture is pressed into the hole, gripping the drywall from behind.
- Thermal Pad/Management: A critical, often overlooked element. This material draws heat away from the LED chips, dissipating it into the ceiling cavity. Proper thermal management is non-negotiable for long life.
Benefits of Press-Fit Integrated LED Fixtures
Why are these fixtures dominating the market? The advantages stack up quickly, especially for the DIYer or contractor looking for efficiency.
Streamlined Installation
The promise of a canless light installation is huge. No wrestling with bulky housings or aligning separate trims. For new construction led lights, you simply run wire to the planned location. In a remodel, you cut a hole, connect the wires to the integrated junction box, and press it in. The wafer light press action is satisfyingly simple. This approach, recommended by , ensures a professional-looking result with far less labor.
Superior Energy Efficiency & Slim Profile
Integrated LED chips are incredibly efficient, producing more light (lumens) per watt than any incandescent or CFL. The entire assembly can be less than an inch thick, allowing installation in spaces previously impossible to light with recessed fixtures. This slim design is a major part of their modern aesthetic appeal.
Longevity and Reduced Maintenance
With no bulb to replace, these fixtures are designed to last for tens of thousands of hours. A common question is, can you replace bulbs in integrated led fixtures? The honest answer is nothe light source is permanent. However, the trade-off is a potentially decades-long service life before the entire unit needs swapping, which offsets the initial cost.
Step-by-Step Installation Guide
Ready to tackle the project? Heres a breakdown of how to install press fit integrated led lights. Always turn off power at the circuit breaker before beginning.
- Plan and Cut: Layout your light locations, ensuring they are clear of joists. Use the provided template to mark the cutout on the drywall. A drywall saw or rotary cutter makes a clean hole.
- Run and Connect Wiring: Run 14/2 or 12/2 NM cable (depending on your circuit) to each location. At the fixture hole, youll need an approved junction box (some fixtures have them built-in). Make your wire connections (black to black, white to white, ground to ground) using wire nuts.
- Prepare the Fixture: Connect the fixtures quick-connect wires to your home wiring. Fold the wires neatly into the junction box.
- The Press-Fit Moment: Compress the spring-loaded mounting clips against the fixture body. Align the unit with the hole and push it firmly into place until the trim ring sits flush against the ceiling. Youll hear a click or feel it lock.
- Power and Test: Restore power and test the light. Most integrated LEDs are dimmable, but always check compatibility with your specific dimmer switch.
Common Installation Mistakes to Avoid
Even a simple press fit led downlight installation can have pitfalls. My honest assessment is that avoiding these errors separates a pro job from a problematic one.
- Ignoring IC-Rating: If your fixture will be in contact with insulation, it must be IC-rated (Insulation Contact). Non-IC fixtures can overheat and create a fire hazard.
- Poor Thermal Management: Dont pack insulation tightly around the fixture, even if its IC-rated. Allow some air space for heat to dissipate.
- Wrong Hole Size: Cutting the hole too large will prevent the trim ring from covering the gap. Too small, and youll damage the drywall or the fixture trying to force it in.
- Overlooking Dimmability: Not all integrated LEDs work with all dimmers. Consult the manufacturers dimmability compatibility charts to pair the right dimmer with your lights for smooth, flicker-free performance.
Right Integrated LED for Your Space
Selecting a fixture involves more than just size and shape. You need to match technical specs to your rooms needs. This perspective aligns with insights from Honest Opinion, which emphasizes
Light Quality
Lumens measure brightness, not watts. For general room lighting, aim for 500-800 lumens per fixture in a living area. Color temperature, measured in Kelvins (K), defines the lights feel. 2700K-3000K is warm and inviting (like incandescent), 3500K-4000K is neutral, and 5000K+ is cool and energizing. In my honest opinion, 2700K-3000K is ideal for most homes.
Critical Specifications to Verify
Dont just buy on price. Check the product details for these non-negotiable items:
- UL Listing Verification: This independent safety certification is an absolute must. It means the product has been tested to rigorous electrical safety standards.
- Warranty Length & Coverage Details: A strong warranty (5+ years) signals manufacturer confidence. Read the fine print to see what it coversdefects only, or does it include lumen depreciation (the light fading over time)?
- IC-Rating: As mentioned, this is critical for safety in insulated ceilings.
- Dimmability: If you want dimming, ensure the product explicitly states its dimmable and lists compatible dimmer types.
Brands and Product Categories
While many brands exist, reputable names like Halo, Lithonia, and Commercial Electric offer reliable options across categories. Youll primarily find Recessed Downlights (the classic round look) and ultra-thin Wafer Lights. Panel Lights are another form of integrated LED, offering large, flat illumination for kitchens and offices.
So, are integrated led lights worth the cost? From my honest perspective, absolutely. The higher initial investment is countered by decades of energy savings, zero bulb replacements, and a flawless, modern look. The installation ease alone, especially with press-fit models, adds tremendous value.
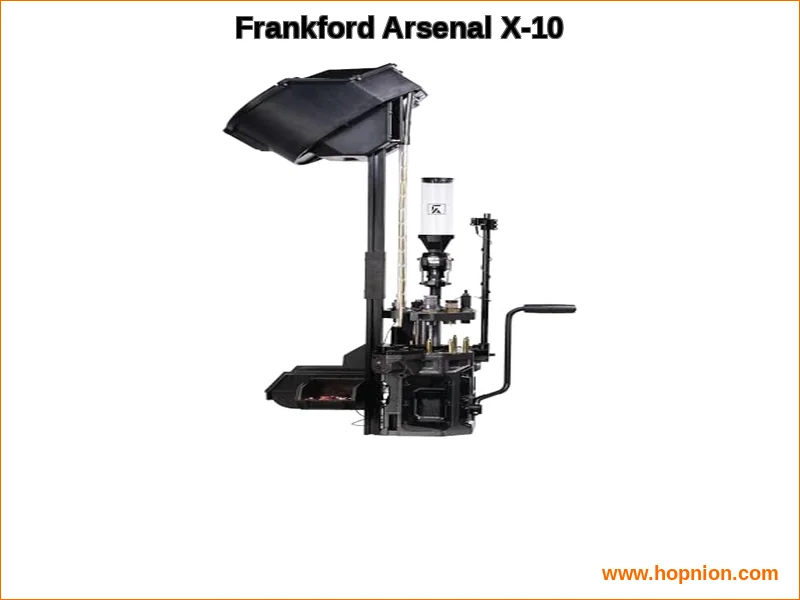
Frankford Arsenal X-10 Progressive Press: A Case Study in Integrated Design
While weve focused on home lighting, the principle of integrated, user-centric design appears in other specialized tools. Take the Frankford Arsenal X-10 Progressive Press. This isn’t a light, but its design philosophy echoes the same thinking: consolidate functions for superior performance and ease.
The X-10 features a robust 10-station design built for maximum versatility with automatic, specialized stations for measuring, priming, feeding, and indexing. Its precision engineering includes integrated ball bearings and an included Powder Measure for smooth operation while minimizing spillage. Honestly speaking, one of its most thoughtful features is the integrated LED illumination in the tool head. This provides direct, shadow-free light on the workspacea critical detail for precision reloading. Its a brilliant application of the same integrated concept we see in lighting, solving a specific user problem (poor visibility)
The press is designed for hassle-free tool head and shell plate changes and can be easily activated with a roller handle. It represents a high-capacity, feature-rich platform for the serious reloader. For those comparing progressive press options, our detailed reviews of the Frankford Arsenal M-Press and the Lee Precision Pro 4000 offer valuable points of comparison. Further research into community feedback on platforms like the r/reloading subreddit or specialist shooting forums can provide real-world user insights.
| Feature | Specification |
|---|---|
| Model | Frankford Arsenal X-10 Progressive Press |
| Key Feature | 10-Station Design for maximum versatility |
| Precision Engineering | Integrated ball bearings & included Powder Measure |
| Illumination | Integrated LED lights in tool head |
| Usability | Intuitive design for easy tool head/shell plate changes; roller handle activation |
| Check current price on Amazon |
Final Thoughts
Integrated LED fixtures with press-fit installation have fundamentally changed the lighting game. They answer the demand for aesthetics, efficiency, and simpler DIY projects. The key is to be an informed buyer: prioritize UL Listing Verification, understand warranty terms, ensure proper dimmability compatibility, and always respect IC-rated requirements for safety.
The difference between integrated LED and retrofit is now stark. Retrofit trims allow you to keep old cans, but integrated units offer a cleaner, more efficient, and more future-proof solution. For most new installations and renovations, the canless recessed lighting path is the clear winner. It delivers a professional-grade finish that elevates any space, proving that the best technology often works by seamlessly integrating into the background.